https://label.toolsforteaching.co.uk/
The Hardware Labeller app is a fully browser-based, interactive teaching and self-study activity designed for students aged 16–19 studying T-Level Digital (Software Development). It covers every component and device specified in Learning Outcome 7.1.2 of the T-Level Digital curriculum — from CPU cores and cache to NVMe storage and cooling systems. No login, no installation, and no data collection: students simply open the link and start learning.
The activity follows a structured three-phase model: Learn → Label → Results, guiding students from first encounter with the content through active recall and into immediate formative feedback.
The Three Phases
- Learn Phase — a twelve-slide carousel covering all LO 7.1.2 hardware topics. Each slide features a summary, detailed bullet-point facts, and a memorable analogy (the “hook”). Slides covering multi-faceted topics — such as CPU performance factors, storage types, and cooling systems — include an expandable accordion of subsidiary concepts. Students can navigate with mouse clicks or keyboard arrow keys.
- Label Phase — three drag-and-drop SVG schematic diagrams. Students drag label chips from a bank at the bottom of the screen onto hotspot markers overlaid on the diagram. Each scene includes distractor labels to increase challenge. Labels can be repositioned freely before submitting.
- Results Phase — an instant scored summary showing total correct answers, a percentage, and a performance band message. A collapsible per-scene breakdown displays every hotspot with green (correct), red (wrong — showing both what was placed and the correct answer), or amber (unanswered) rows.
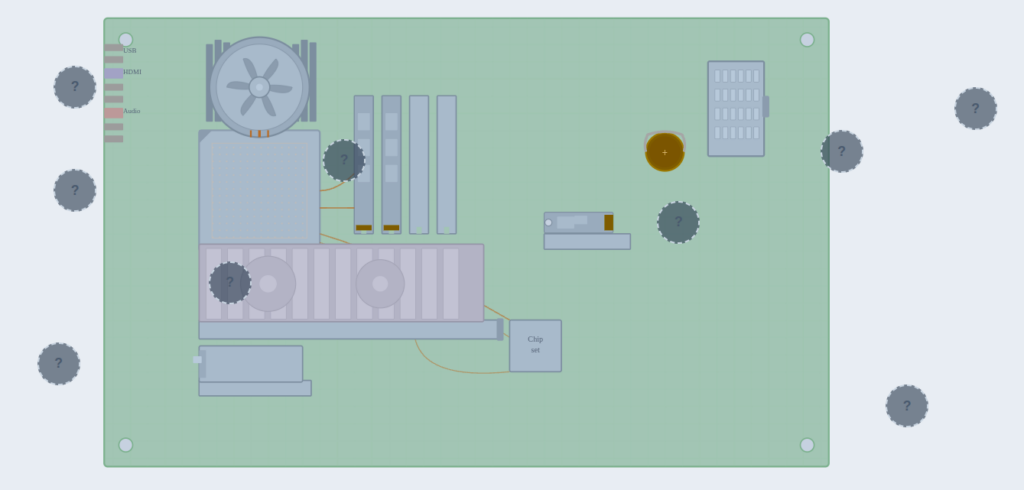
The Three Labelling Scenes
- Inside the PC — a schematic ATX motherboard with nine hotspots: Motherboard, CPU, Air Cooler, RAM, GPU, NVMe Drive (M.2), CMOS Battery, PSU Connector, and NIC (PCI Card). Two distractor labels (Sound Card, USB Hub) are included in the bank.
- External Peripherals — a desk setup schematic with seven hotspots: VDU (Monitor), Keyboard, Mouse, Speakers, Barcode Scanner, USB Port, and Ethernet Port. Two distractors (Webcam, Microphone) are included.
- Storage Devices — four storage devices shown side by side with speed annotations for context: HDD (Magnetic), SSD (Solid State, SATA), NVMe Drive (M.2, PCIe), and DVD-ROM (Optical). Two distractors (USB Flash Drive, Memory Card) are included.
Curriculum Coverage — T-Level Digital LO 7.1.2
- Input devices — keyboard, mouse, barcode scanner (optical sensor, key matrix, laser reflection)
- Output devices — VDU (pixels, resolution, refresh rate), speakers (digital-to-analogue, cone movement)
- CPU — Fetch–Decode–Execute cycle, cores, clock speed (GHz), cache (L1/L2/L3, SRAM)
- Main memory — RAM (volatile, DDR5), ROM (non-volatile, BIOS/UEFI, POST)
- Secondary storage — HDD (platters, read/write head, SATA), SSD (NAND flash, SATA), NVMe (PCIe, M.2), DVD-ROM (laser, pits and lands)
- Motherboard — PCB, chipset, CPU socket, DIMM slots, PCIe slots, M.2 slots, ATX form factor
- CMOS battery — CR2032, real-time clock, BIOS settings persistence
- GPU — shader cores, VRAM, PCIe x16, discrete vs integrated
- Network interface devices — PCIe NIC, USB network adapter, Ethernet, RJ-45
- Cooling systems — air cooling (heatsink, thermal paste, fan), liquid AIO (pump, radiator, TDP)
- Sensors — temperature, accelerometer, ambient light, IoT sensors, I²C/SPI/UART
- PSU — AC to DC conversion, voltage rails, wattage, 80+ efficiency ratings, ATX connectors
What Students Learn
- Component identification — recognising hardware by appearance in schematic diagrams, not just by name
- Functional understanding — each teaching slide explains what the component does and how, not just what it is called
- Comparative knowledge — storage speed annotations and CPU performance sub-topics encourage students to reason about trade-offs
- Recall under pressure — distractor labels mean students must discriminate between plausible alternatives, not just pattern-match
- Self-assessment — the Results phase gives immediate, specific feedback on every hotspot so students know exactly what to revisit
Teacher Tips
- Use the Learn phase as a pre-lesson primer: set it as a starter activity for students to work through independently before a teacher-led discussion.
- Pause on the CPU slide and ask students to close the accordion before revealing each sub-topic — use the hook analogy (“cores as chefs”) to check understanding.
- For the Label phase, encourage students to attempt all three scenes before submitting — the Results phase scores all scenes together, rewarding breadth of recall.
- Project the Results phase after a class attempt to discuss common errors — the per-hotspot breakdown makes misconceptions visible at a glance.
- Use the Try Again button for a second attempt after reviewing incorrect answers — the random label bank order means re-attempts feel fresh.
- The light/dark mode toggle (top-right of the header) can be useful when projecting in brightly lit classrooms.